1. Balance vs. posture
2. Head and neck
3. Arms and hands
How well you use your body to play the oboe is critical to producing satisfying performances. Those who play with tension risk injury and the shortening of their career, and will likely perform with less fluidity and ease. The sources of tension in oboe playing include poor posture, inadequate understanding of how to efficiently support the tone, and a lack of technical preparation.
1. Balance vs. posture
To be balanced is to allow one’s bony structure to counteract the inevitability of gravity. When balanced, the oboe player should feel buoyant and free, with unimpeded breathing. Conversely, posture is the adherence to an abstract ideal whereby one looks a certain way (sitting up straight with shoulders back, etc.). Balance is an internal, lively sensation while posture has more to do with how you look on the outside. When you are balanced, you have movement in any direction available to you. In balance, your bones do the work of sitting up, and in posture, you unnecessarily engage muscles just to look a certain way. When you are balanced, you are able to find and release tension in other parts of your body because you are not preoccupied with holding yourself up in a certain way.
Focusing on the creation of a musical line rather than the production of rapid notes that  are not yet completely comfortable can also shift the focus away from creating tension in the fingers, hands, and arms. Practice habits that allow for the calm learning of technique also support a more relaxed performance. Start from a place of balance and you will have a tension-free foundation upon which to build your oboe-playing technique.
 When playing while standing, stand with weight in the bottom of the feet (the balls and the heel both) and with the head balanced freely on the spine. When sitting, distribute the weight to the feet and the “sit” or “rocker” bones, possibly leaning against the back of the chair if the angle is not too great. If the chair is too tall for feet to have weight in them, try placing blocks or books under the feet, or sitting farther forward on the chair so that the heels can touch the ground.
2. Head and neck
 Balance the head on top of the spine, much like a “bobble head,” rather than using muscles to hold the head up. Bring the oboe up to the embouchure, rather than moving the head to the oboe. The joint between the head and spine is called the atlanto-occipital joint (AO joint) and can be found by placing index fingers into the ears parallel to the ground. With the index fingers in the ears, gently rock the head back and forth to feel the movement and balance of this joint. Notice in the image that the AO joint is above the embouchure. Understanding this relationship will allow you to play with a free neck and can improve your breath support.
[Image of the AO joint from The Body Moveable by David Gorman, used with permission”]
3. Arms and hands
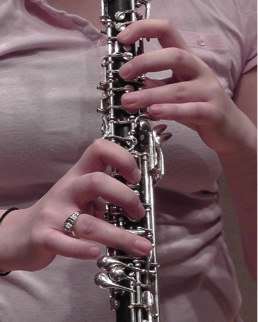 Hold the oboe at an angle of about 45° from the body, balancing the instrument on the right hand with the thumb under the thumb rest on the bottom joint, the first finger on the left hand on the first key, (the half-hole key), and the left thumb on the back of the instrument, as in the picture. The final balance point is the embouchure. The weight of the instrument is delivered through the thumb, the wrist, forearm, upper arms, collarbone, and finally, the arm joint that is most forgotten, where the collarbone meets the skeleton at the sternum. Hold the hands in a relatively straight line from the elbow, keeping the wrists as neutral as possible to reduce future inflammation and damage from strain on bent joints.
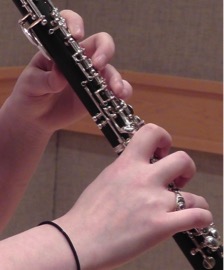 Finger facility works best when the fingers are rounded over the keys with the relaxed curve found in the hand when hanging loose by the side of the body or when catching a small ball. Both little fingers should be in line with the elbows. The 4th fingers of both hands tend to curve less and are the fingers most likely to not cover the hole completely, especially for players with small or stiff hands. It is possible to put a piece of tape over these open holes, temporarily, to help notes come out that otherwise won’t, but this will ultimately affect the pitch negatively. Keeping the fingers close to the keys so they have only a short distance to travel also helps the fluidity and ease of technical passages.
The pad of each finger should be used to cover the holes. The hand, wrist, and/or arm may need to be angled or rotated to accomplish this easily. The placement of the thumb under the thumb rest may also need to be adjusted farther out, or in, depending on hand size and finger length. Some players move or replace the thumb rest with a different model, which may require new holes to be drilled into the instrument.
Being double-jointed can make curving the fingers very difficult, affecting the ability to use some keys quickly, such as those needed to play the Left E6. Sometimes the fingers “lock,” making fast technique very difficult, and causing tension when trying to keep the fingers in place. See The Oboe Art and Method by Martin Schuring, pg. 29, for more ideas on dealing with double-jointed fingers.
