1. Knife sharpening
2. Regrinding the reed knife (also putting a first burr on a new knife)
3. Equipment – knives and stones
4. The mechanics of scraping and clipping
5. Cane selection
6. Cane preparation
7. Tying on reeds
8. The basics of scraping
9. Balancing a reed – different for different purposes
10. Specific scraping techniques for the tip
11. Specific scraping techniques for the heart
12. Specific scraping techniques for the back
13. Tying On English horn, Oboe d’Amore, and bass oboe reeds
14. Specific measurement suggestions for English horn and d’Amore reeds
15. Resources
1. Knife sharpening
The most important determinant for consistently good reed making is a sharp knife. Scraping with a dull knife is less precise, particularly in the back of the reed where the rails or spine can easily be lost. A dull knife, which needs more pressure to take cane off, can compress or crush the cane, and may too easily take chunks off the end of the tip. Reed making is also much quicker and easier when using a sharp knife.
There are many knives from which to choose with different edges and hardness of metal, and sharpening stones with different levels of abrasiveness for various stages of sharpening. Some reed makers use several different knives and stones while making a reed.
While there are several methods for sharpening a knife, the general principle is to create a small bevel, or burr, so to allow scraping the cane, rather than just cutting it. This burr can be felt by running fingers over the edge of the knife (not along the knife edge as that can cut). Many reed makers test the sharpness by trying to catch the burr on their thumbnail.
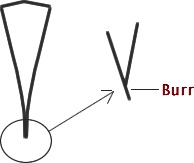
The key to creating this burr is sharpening unevenly, i.e., a different angle on each side of the blade. Generally right-handed people sharpen the knife flat as they bring it toward them right to left, and on an angle, often around 30° or greater, as they move it away from them, left to right. Reverse the angles and directions for left-handed people. The angle the knife is raised depends on the preference of the maker, and can be raised ever higher to continue to get a better edge when the knife is no longer getting sharp at a lower angle. Keeping this angle very consistent each time along the whole edge of the knife (while slowly moving the angle higher over time) is key for consistent sharpness. With some experience, it can be possible to feel the angle of the burr while sharpening.
The blade edge should be pushed across the stone with equal pressure throughout its entire length. The knife may need to travel across a narrow stone to ensure that the whole edge is sharpened.
Sometimes the blade becomes uneven and cannot fully touch the stone to be completely sharpened. The butt of the knife may need to be reduced to allow the middle of the blade, where most of the scraping occurs, to touch the stone.

Alternate the strokes between the flat and angled. The angle makes the burr, the flat side sheers it off so it’s not too big. Some reed makers use a consistent amount of strokes for each direction, and some do not.
How often a knife needs to be sharpened depends on the hardness of the blade, and the technique and preference of the maker. Usually beginning reed makers do not sharpen their knives nearly enough. Generally, knives need to be sharpened many times while scraping just one reed.
At some point, the angle of the knife becomes nearly perpendicular, and it becomes time to regrind the knife with a coarse stone to make the edge more easily sharp again.
Many new knives come without a clear burr. Putting the first burr on a knife is similar to regrinding, see below.
Jennet Ingle on knife sharpening
2. Regrinding the reed knife (also putting a first burr on a new knife)
Regrinding a knife involves using a more abrasive stone than that used for regular sharpening. A diamond dust (lubricate with water) stone works well. Using circular motions, sharpen the knife flat from right to left (opposite for left-handed people) to first create a backwards burr (the knife feels sharp when moved backwards across the fingers). With an older, well-used knife this may take awhile. Creating the backward burr first in this case helps to get closer to a precise, defined final edge. After making a backwards burr, switch to the opposite direction (left to right), and sharpen with circular motions at the preferred angle (often 30°) to create the forward burr.
After regrinding, the burr needs to be refined on the usual sharpening stone before using.
How often a knife needs to be reground depends on the hardness of the metal, and how often the knife is sharpened and used.
3. Equipment – knives and stones
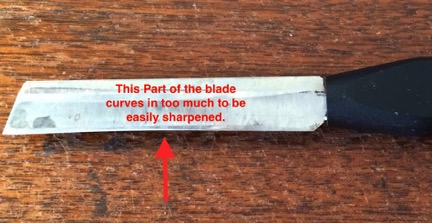
The majority of reed makers find the double hollow ground, rather than the bevel knife, the easiest to work with. There are several blade thicknesses and strengths to choose from and are a matter of preference. The Philadelphia style is a very thin blade, while many, like the Landwell knife, are thicker. Thinner blades are easier for detail and cutting the tip, thicker blades for consistent smooth scraping.

Many new knives come without a proper edge and need to be reground to get that first burr (see Regrinding the reed knife above).
Different types of sharpening stones have different purposes. There are very smooth and hard sharpening stones, like Hard Arkansas (water stone), that give a very fine sharp edge, and abrasive stones, like a diamond dust (water stone) that remove much more metal more quickly for regrinding.
Many reed makers use the fine India oilstone for general sharpening, lubricated with mineral or honing oil. This stone is medium coarse, and works best with oil particularly when new.
Some people prefer strops or ceramic or metal rods to sharpen their knives. Some people use several different stones, moving from more to less coarse to end up with a very sharp edge.
4. The mechanics of scraping and clipping
Holding the reed
Tiffany DiPiazza on holding a reed
One hand will hold the reed (the left for right-handed people), the other, the knife (the right for right-handed people). Left handed people may reverse the knife and reed hands.
Each person will hold the reed slightly differently, depending on individual hand size. Usually the reed lies on the first finger and is held firmly by the rest of the fingers. The goal is to be able to control the reed, support the tip, and press the tip flat on the plaque without cramping the hand.
Holding the reed and knife and clipping the tip
Tiffany DiPiazza on holding the reed and knife
The plaque is inserted between the blades to support the tip while being scraped on. Don’t push the plaque too far in however, as it will open the sides of the reed more, and may lead to loose sides and instability. If the knife catches on the plaque occasionally and is pulled out of the reed that is annoying but expected. The plaque is helpful when scraping the tip and heart, but not necessary when scraping the back.
The knife should be held in such a way that it gives the reed maker control of exactly where the reed is scraped and how much pressure is used. The knife must be sharp enough that the pressure can be light enough to be able to scrape just a narrow strip of cane through the back without losing rails, spine, or the center or corners of the tip, and to avoid hand pain from too much muscle stress. Gentle pressure, mostly in the hand holding the reed, is used to flatten the reed tip on the plaque for easier scraping.
Scrape rather than slice or press the knife into the cane. Feel the bumps and unevenness in the cane through the knife and scrape over them, avoiding catching the knife in the cane, which can cause tears or make ridges bigger.
Hold the knife perpendicular to the reed, angling side to side to get at different sections. Scrape forward, sometimes rotating the wrist to lighten toward the end of the scrape (when scraping the back to the heart), and moving the knife forward and down when thinning the end of the tip to avoid thickness at the end of the reed.
Often reed makers have the thumb of the hand holding the reed resting on the knife to have more control right where the knife is scraping.
Tiffany DiPiazza on holding the reed and scraping the back.
When clipping with either a knife or razor blade, hold the reed in one hand, and the knife in the other. Generally clip as little as possible. Some otherwise good reed knives seem too thick to cut well, so some makers use a different, thinner knife to clip with.
It is important for the block (or billot), used to cut the tips on, to be smooth and only slightly rounded. Older blocks with many nicks can be smoothed with sandpaper as needed.
Tiffany DiPiazza and clipping the tip.
It is possible to clip the tip on an angle by holding the back of the reed up, and cutting forward. The resultant uneven tip adds resistance to the reed and can help keep octaves more in tune.
5. Cane selection
Oboe cane selection with Jasper Hitchcock
Specifics to know before purchasing cane:
- Generally look for harder cane with tight, small grains (vascular bundles) for more easily successful reeds.
- Ask for recommendations of brands of cane from colleagues, teachers, and professionals.
Tube cane (oboe)
Diameter: 10–10.5mm smaller diameter, for more open reeds / 10.5–11mm larger diameter, for more closed reeds
Gouged only cane (oboe)
Standard gouges are between .58–.61mm in the center and .45mm at the sides.
Hand-gouged cane is generally more consistent than fully machine-gouged, as the cane is usually flipped when hand-gouged, and selected for evenness.
Gouged and shaped cane (oboe)
Shapes vary in width affecting the pitch and tone. Poor shaping, by machine or hand, sometimes with visible nicks, can cause leaking. Sometimes the nicks can be sanded smooth and the cane tied on with no leaks.
If there is a choice, pick a standard shape at first. Standard shapes include Pfeiffer Mack, Brannan X, and Gilbert -1.
Selecting cane for splitting from tubes and for gouging
Every part of the tube may not be usable. Some sections may be too warped, or may not have the desired diameter.
Select tube and pre-gouged cane that:
- has the diameter desired (use a radius gauge to measure)
- is straight (check on a flat surface)
- is without large bends and twists
- if bent, has both ends bending up rather than down (more likely to stay in the gouger bend)
- has tight grains (not pithy, powdery, or shredding)
- is hard (can be determined visually by the tightness of the vascular bundles and/or by a density meter, see Reed Making Supplies: Even more expensive tools that can help with consistency)
- doesn’t have too many discolourations, although some are fine.
- has not been damaged by worms (they leave whitish “trails” on the cane), or is not black with mold (if the cane has not been properly dried).
Selecting cane for shaping
Select gouged cane that:
- has a consistent, even gouge on both sides of the cane (thicker in the center and thinner on the sides evenly).
- is .58–.61mm in center and .45mm at sides.
- has tight grains and is not too pithy
Selecting shaped cane to tie on
Select cane that:
- has smooth sides without nicks
- has a consistent looking shape
Tools used: flat surface (often the radius gauge), radius gauge, 600 wet/dry sandpaper.
6. Cane preparation
Pregouging
Pregouging with a fillotine with Robin Driscoll
- Soak tube cane in warm water for approximately 15 minutes or longer (some oboists also gouge cane dry fro more precision but that more readily dulls the gouger blade).
- Measure the tube with the radius gauge and eyeball to determine the straightest sections with the most desirable diameter.
- Select the parts of the tube to be gouged and cut tube apart with cane splitter (into three equal sections) or razor blade (2–3 sections).
- Use the guillotine (adjusted to the length of the gouger bed) to cut the straightest lengths.
- Push the pieces through the appropriate pregouger. Narrow the ends of the cane as necessary so they fit better in the gouger bed.
Gouging
- Put the pregouged cane in the gouger bed, making sure it is held down by the clips. Holding the gouger on the lap, or on a table, push the carriage back and forth until the gouger wheel runs on the parallels. Flip pieces around several times for evenness.
- Check thickness, at least in the center, of each piece with the micrometer
- Keep the cane wet if continuing to process.
- Clean the gouging machine by doing the following:
- Brush off loose cane, and pull cane from around the blade.
- Keep the blade dry and oiled by resting the blade on a cotton swab with mineral oil on it when finished gouging.
- Don’t chip the blade by banging it into a hard surface, including other parts of the machine.
Shaping
Shaping oboe cane with Katherine Needleman
- Use an easel to thin the ends. The easel can also be used to gently score the center of the cane for folding. However both of these tasks can be done without an easel.
- Fold the cane in the middle over a finger or knife. Press the sides closed, not the center, to avoid cracking the cane.
- Slightly narrow the sides of the cane at the fold where it will fit over the shaper. Make sure it just fits between ears and doesn’t become too narrow.
- Line up the cane on the shaper and tighten the handle.
- Keeping the razor blade perpendicular to the shaper tip, scrape cane off, following the shaper tip exactly. Move quickly and firmly to avoid creating nicks trying to be too careful. Use a new razor blade for every 1-2 pieces of cane.
The cane preparation process by Reed Pros
Tools: razor blades, cane splitter (or can use razor blades), guillotine, pregouger (planer and bed or fillotine), gouging machine, micrometer, easel, shaper handle, and tip.
7. Tying on reeds
Tying on Reeds with Mickailis Molina
To make a good, stable, consistent reed, blanks need to have tight sides and not leak. To accomplish this, the cane must be bent in the right way (selection when gouging), and the shaping must be even without nicks. Also, the thread must be pulled tight but not tied over the end of the tube, and the sides of the cane should be slipped correctly and locked tightly together.
To prepare:
- Tie thread to a solid object. Many reed makers use a C clamp attached to a reed making desk. Some makers use a chair back.
- Rub beeswax on the thread to help it slide less on the cane.
- Put the tube on the mandrel. The tube should either extend past the end of the mandrel or match it. If the mandrel sticks out past the tube, it is very easy to overtie the reed.
- For right-handed people (reverse for left-handed people), hold the mandrel in the left hand with the piece of cane lined up and straight on the flat sides of the tube (which is on the mandrel). Measure the total length of the reed. Most shapers are designed for an initial reed length of 72mm.
- With the thumb and first finger now holding the cane on the tube, slip both blades slightly to the right (the back blade will move left. Reverse for left-handed people) and hold.
- Hold the thread in the right hand with just a small amount wound off the spool (sometimes makers rewind thread on a small spool for more ease).
- Use the left thumb to mark the place about three wraps below the end of the tube, and placing the reed on the thread, wrap loosely up to the end of the tube, checking where that is by looking in between the pieces of cane before pulling tight. Some makers make a mark showing the end of the tube on the cane.
- Pull these three wraps tight and check that the sides of the reed seal and are slipped correctly on both sides. It’s most important that they are sealed and slipped right at the bottom where the cane meets the tube. Also check that the thread has not been over tied over the end of the tube, by measuring the length between the end of the tube and the top of the wrapping (comparing with another unused tube makes it easy). Tubes are usually 47mm. Over tying can crush the cane and cause response and pitch issues.
- Finally, check that the reed is still aligned along the flat side of the mandrel, and relatively straight.
- Cross over with the thread and wrap down the rest of the tube, continuing to pull tightly, especially as the thread comes around the reed. “Tight” in this case means almost tight enough to break the thread.
- At the end, tie several strong knots (usually half-hitches), working them close into the tube, a finger holding the loose end of the thread to keep it tight while making the knots. Once the knots are tied, cut the reed off the tying thread.
Tiffany DiPiazza on tying the knot
- Measure the total reed length and the thread length to make sure it’s not over tied. Check for suction/leaks by sucking on the sides of the reed.
- Remove ears (some shaped cane comes without ears), using a razor blade or knife lying flat on the edge of the cane, and following the line of the shape as the ears are sliced off. Be careful to not narrow the tip of the reed too far. Use an emery board to smooth the edges completely.
- Scrape over the sides of the tip, and outline the reed before putting it away (optional). Some reed makers would also open the blank at this point, though that is not necessary (see below on how to open the reed). Opening the reed right away may lead to a reed with a larger opening, which may or may not be desired.
- Some reed makers would continue and finish the reed at this time. Others would make the reed over several days. Extending the process over several days appears to give the reed more longevity and consistency.
Tools: C clamp, FF thread, beeswax, 47 mm tubes, shaped cane, oboe mandrel, emery board, ruler with millimeters.
8. The basics of scraping
Basic outline of a North American, long scrape style oboe reed:
How to open and start the reed
- Soak the reed. A minute or less in lukewarm water should be fine. Hotter water and longer soaking time will strengthen the reed if needed.
- Scrape over the end of the tip, onto the finger that’s supporting the tip, until it’s thin enough to easily clip a small amount off the end with either a sharp knife or a razor blade. If the reed is still not completely open, a plaque can be slid between the blades to finish opening the tip.
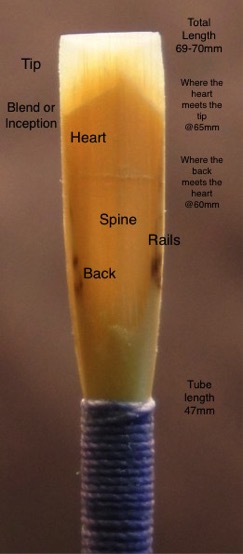
- Now outline the parts of the reed. Mark on the reed with a pencil the top and bottom of the heart (65 and 60mm), and keep redrawing these marks as they are scraped off. With plaque in, outline the sections with the knife, tip-heart-back, keeping them smoothly connected.
- Smooth over the end of the tip to avoid extra thickness there, and thin the sides of the tip more than the center. Smooth over the heart into the tip, careful to not end up making a particularly thin spot or line where the tip meets the heart.
Scraping the sides of the tip with Tiffany DiPiazza
- Thin the heart and the back, keeping them smoothly connected. Take off the bark and the layer underneath, while angling the sharp knife to keep rails and a spine. Keep the heart generally the same thickness front to back. Avoid nicks between the heart and back by letting the knife come up at the end of the stroke into the heart.
Scraping the back with Tiffany DiPiazza
Some reed makers end up with ridges or separations between the sections that, when the reeds is balanced properly, work well. But finding a balance is easier at first when the reed is smoother.
While thinning the reed, strive to keep all “body parts”, i.e., all of the tip, and the rails and spine.
1. Reduce each section until the reed makes a sound. The sides and end of the tip should be the thinnest part.
2. The more similar the sections are in thickness, the easier and more vibrant the reed will be. The more difference in thickness between the sections, the darker the tone will be, and the stiffer and more stable the reed.
James Ryon:“The strength of the heart (or plateau) will control the opening of the reed and determine how much embouchure is needed to control the air flow and dynamic range of the reed. The heart and back are also the areas responsible for maintaining the stability and seal of the reed. Scraping on the plateau and back of the reed will also change the apparent vibrancy of the tip. Since all parts of the reed connect to, and affect one another, they must be balanced to work together.”
- When easy and vibrating well, add separation for focus and stability between the heart and the tip on the sides, and if needed, the center. Create separation by scraping, or scoring, between the sections.
9. Balancing a reed – different for different purposes
Different reed balances work better to meet the variety of physical requirements of the players and the demands of the music. The balance may need to be, for example, either for more volume and stability in high register or for more response in the low register. These considerations are even more important for the more “limited” instruments, particularly the bass oboe but also the English horn, depending on the repertoire.
Generally, a more blended reed is more vibrant and easier, and a more separate reed is more focused and stable. The hardness of the cane also contributes to the level of focus, stability and response.
Blending techniques (in order of frequency)
- Smooth heart to tip, from the corners of heart up the sides of tip
- Smooth back into heart
- Reduce the whole heart, still leaving a spine and rails by focusing scraping in the channels on each side
- Lessen the angle of the tip clip
- Smooth heart into tip in the center of reed
Separating techniques (in order of frequency)
- Separate the tip from heart at the corners
- Thin the sides of the tip
- Separate the back from the heart with nicks or scores
- Clip the tip on an angle
- Separate the tip from heart in center with nicks or scores
10. Specific scraping techniques for the tip
Thinning and separating the sides of the tip for ease and focus
Thinning and separating the sides of the tip increases vibration and ease up to a point, then begins to decrease vibration past a certain thinness, weakening the reed. Thinning the sides of the tip tends to focus and thicken the tone, while adding resistance and stability, especially after clipping.
Jasper Hitchcock and separating the tip of the reed
Clipping the tip
Generally, clipping the tip raises the pitch and improves stability. If too much is clipped off, the reed can become too hard to hold together with the embouchure, unresponsive, and resistant. A good candidate for clipping will be slightly (or noticeably) flat and noisy, and too easy. Bad tone and/or flat pitch alone are not necessarily reasons to clip the tip. Always clip off the tiniest possible amount; it’s better to clip a reed three times than to clip it too much at once.
Scraping just the end corners of the tip
For a somewhat quicker response with less resistance, scrape the end corners of the tip, and maybe all across the end of the tip. Generally, this seems to have a negligible effect on stability and creates a more responsive articulation.
Scraping over whole tip for more vibration
If the reed is not vibrating well, scraping the whole tip, including the center, is seldom a good idea. It tends to make the reed bright and even chirpy if the tip gets overly thin in one place. In the case of an un-vibrant reed, it is usually better to try to get more vibrations by scraping the heart and even the back, as well as the sides and corners of the tip. Remember that while scraping the tip makes the tip vibrate more, it doesn’t necessarily make the whole reed vibrate more.
11. Specific scraping techniques for the heart
Scraping the heart (generally avoiding the center spine and rails) usually lowers the pitch, decreases stability, and increases flexibility and warmth in the tone. If too much is taken off the heart, the reed can become too vibrant and unfocused.
Martin Schuring: Try to stay away from the center of the heart unless the reed just doesn’t vibrate at all. Think of the heart as a sort of control valve that regulates the passage of the tip vibrations to the rest of the reed. If the heart is too thick, it has the effect of isolating the tip and preventing the rest of the reed from vibrating enough. The reed will seem shallow, stuffy, and resistant. If the heart is too thin, it has the effect of making the tip longer. There will be plenty of vibrations, but the reed will be wild, noisy and likely unstable. Of all the scraping operations, scraping from the heart has the most damaging effect on the reed’s stability, so test frequently.
The rails and spine in the heart can also be narrowed to allow more vibration and ease if the reed continues to be too hard and stiff.
Scraping from the back into the heart allows for more vibration throughout and a richer sound without destabilizing the reed as much as scraping on just the heart can.
12. Specific scraping techniques for the back
Scraping the back into the heart generally leads to a warmer, rounder, less bright (or noisy) sound. Going too far can lead to flatter pitch and decreased stability. The outcome depends very much on the balance of the reed before scraping, but will usually give the results listed above. After the first roughing-out stages, cane should mostly be removed from the top of the back. Avoid having too much of a bump or too many nicks between the top of the back and the heart by letting the wrist rotate the knife up to follow the shape of the heart while scraping.
Scraping the bottom half of the back closer to the thread, provided that there is not too much gone from this section already, can help to close the back, tighten the sides of the reed, and raise the pitch of the high register.
James Ryon: The plateau (heart) and tip are the areas most responsible for the upper octave crow. The plateau and back are the areas most responsible for the lower octave crow. The lower octave crow will indicate depth of sound and ease in low register and can be produced by scraping on the back and plateau of the reed.
13. Tying On English horn, Oboe d’Amore, and bass oboe reeds
While in general, reeds for other family members are made in a similar fashion to oboe reeds, there are some differences. Most importantly, the other members of the oboe family all require their own tube cane with a larger diameter (except the musette which would be smaller), and own gouger, shaper, and tubes. Most people, unless they specialize on that instrument, purchase already gouged and shaped cane, and/or finished reeds.
More even than the oboe, the balance of the English horn, oboe d’Amore, and bass oboe reeds affects pitch, volume, and stability in the upper registers, and will need to be experimented with. Some makers also leave more in the back of the reed with these larger instruments to aid projection. These instruments all have bocals, which act like an extension of the reed, and affect the pitch (particularly in the high register), the tone, and the response.
The reeds for the larger instruments generally use wire to help hold the blades together, and manage pitch and focus in the high register. The wire is not intended to help manipulate the opening, though it can be used that way in a limited fashion. The wire needs to be pulled tight enough to not slide down the reed when it’s dry, but not so tight to crush the sides of the cane too much. Some makers use thinner wire (26 gauge) and wrap it around three times; others use thicker wire (24 gauge) and wrap it around twice.
Tiffany DiPiazza putting wire on an EH reed
Jasper Hitchcock on the purpose of English horn wire
Often reed makers use a small piece of plastic tubing to help with the seal between reed and bocal.
To avoid buying both an oboe and an English horn (or oboe d’Amore) mandrel, place an oboe tube that’s missing the top part of the cork onto an oboe mandrel which then increases its size to fit English horn tubes.
For more information on making English horn reeds, see the resources section below.
14. Specific measurement suggestions for English horn and d’Amore reeds
Specifics for English Horn Reeds
Gouge: .70mm in the center and .58 on the sides
Tubes: 27mm
Wire: 24 or 26 gauge beading wire
Tying Length: 59–61mm
Finished length: 55–57mm
Where the tip meets the heart: 52–53mm
Tip length: 3–4mm
Heart/Plateau length: 7–8mm
Back/windows length: 10–15mm
Where back meets the heart: 45mm
Wire placement: 3-10mm above the end of the reed/thread (some makers like the wire on the bark, some above it)
Suggested Shapes: Gilbert-1, Giacobassi
Specifics for Oboe d’Amore reeds
Gouge: .62mm in the center, cane diameter of 11–11.5
Tubes: 25mm
Wire: 24 or 26 gauge beading wire
Tying Length: 52mm
Finished length: 49.5-50.5mm
Where the tip meets the heart: 46–47mm
Tip length: 2–3mm
Heart/Plateau length: 4–5mm
Back/windows length: 10–12mm
Where back meets the heart: 40mm
Where scrape starts above the thread: 5–6mm
Wire placement: 3-10mm above the end of the reed/thread (some makers like the wire on the bark, some above it)
Suggested Shapes: Rigotti and Glotin
Tools
wire (#24 or #26 gauge beading wire), pliers, wire cutters, instrument specific mandrels (or could be old oboe tube and oboe mandrel), tubes and cane specific to the instrument.
15. Resources
Videos on Oboe Reed making
Jennet Ingle: Many videos on reedmaking
Overview of reed making with Jasper Hitchcock
Reed tests and tips by Jasper Hitchcock
Jasper Hitchcock on the Tip to Plateau Transition
Tying on oboe reeds with Diane M-W
Tying on Reeds with Mickailis Molina
Articles and Books On Reed making
How to Make Oboe Reeds with Courtney Miller
Oboe Reedmaking Blog by Aaron Lakota
Detailed Oboe Reed Dimensions – Martin Schuring
High Altitude oboe reed making with Khara Wolf
Thesis suggesting that the player influences the reed more that the reed influences the player
Articles And Videos On English Horn And Baroque Oboe Reedmaking
Martin Schuring on English horn reeds
Several articles on English horn reedmaking by Carolyn Hove
Jennet Ingle on English horn Reeds
Jasper Hitchcock and A-flat5 on the English horn
More Information on Knife Sharpening and Equipment
Jennet Ingle – Knife Sharpening
Knife Sharpening Tools with Khara Wolf
Gouging Machines with Karen Kistler
