1. Evenness
2. Articulation and fingering coordination
3. Blipping
4. Finger issues
5. Octave keys
The half-hole (C-sharp5, D5, E-flat5)
Half-hole to first, back, or thumb octave (E5–G-sharp5)
First or back octave to second or side octave (A5–C6)
High notes – harmonic fingerings (C-sharp6, D6, E-flat6)
E6 and above
6. Downward slurs
7. Alternate fingerings
Forked/Left F (F4 and F5)
Left E-flat (E-flat 4 and E-flat 5)
Right A-flat (A-flat4 and A-flat5)
Left E-flat/A-flat (octaves 4 and 5)
Alternate C4 / “banana” key
8. Trills and trill fingerings
9. Technique problems and solutions
10. Resources
1. Evenness
To play groups of sixteenth notes evenly, lengthen the first note of each group of four 16ths a very, very small amount. Also hold the first note of each slur this way. This tiny amount of length, or weight, gives poise to runs, and helps them to sound more even.
Also, be poised before starting technical passages. Take that split second to be balanced before beginning rather than “falling into” the passage. Breathing in slowly, if possible, can help with staying calm.
2. Articulation and fingering coordination
Lengthening slightly the first note of a group of four sixteenth notes allows for the poise that can help coordinate the tongue with the fingers. Also, focusing on the musical goals of a phrase can even out and clarify articulation by giving it context. Trying different articulation techniques such as articulating on the wind, and double-tonguing may also help.
For all technique, but particularly that with rapid articulation, the reed must be responsive, but able to hold itself together with less embouchure control. Fast articulation, especially lower passages, necessitates a responsive reed, and the opening and rounding the oral cavity to find the place where the notes don’t jump up the octave.
3. Blipping
There are a few traditional finger “blips” on the oboe, particularly from A4 to C5 and B-flat4 to B4 (and the octave above). Poise, or a very small amount of extra time/weight, on the first note of this interval will help in reducing blips.
Blips that can be reduced by specific fingerings are listed below. Numbers 1,2 and 4 are also trill fingerings.
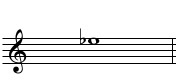
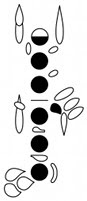
1) between F-sharp and G-sharp4 and 5: Use the articulated G-sharp/F-sharp connection (assuming the instrument is in adjustment). To use this connection, hold the G-sharp key down, while pressing the F-sharp key (first finger right hand). The G-sharp key should remain completely closed, and an F-sharp will sound. Now going to G-sharp requires only lifting one key, the F-sharp.
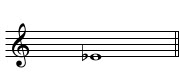
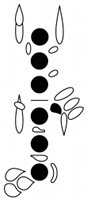
2) between D-flat-E-flat4 and 5: Press both keys at once, and the D-flat cancels the E-flat (assuming the instrument is in adjustment). In passage work including both these notes, pressing both keys at once to get a the D-flat, then lifting the D-flat for the E-flat, can eliminate a blip between the D-flat and E-flat.
3) between B4 to C-sharp5 or D5: Work on gently slapping the fingers on the keys to synchronize them. Get the fingers ready on the preceding note, almost touching the keys for the new note. Don’t lift them too high. Use nose/forehead grease to get the left hand first finger to slide farther if the notes are coming out down the octave. Use only enough finger pressure to close the keys. Work on blowing air through right to the end of each note during the note changes.
4) between B3 and C-sharp4 (this key connection is missing on basic student instruments): B3 can be played with either the low C or C-sharp key, depending on the context. Using the C-sharp key can eliminate a blip caused by using the C key.
5) between A4 or 5 and C5 or 6: Poise on the first note of this interval will help avoid the unwanted “B-flat” caused by fingers not moving at the same time.
4. Finger issues
These are fingering issues to look for that cause extra sounds that mar an otherwise successful technical passage:
1) “borking” when the half-hole isn’t opened enough or quickly enough, and the half-hole note sounds partially down the octave.
2) “squeaking” when the fingers don’t completely cover some holes.
3) “squeaking” or wrong notes when side and trills keys are opened accidentally, or keys closed accidentally by bad hand position or even finger nails that are too long.
Sometimes these extraneous sounds happen so often they are not actually noticed by the oboist. Usually it’s the awareness of these issues that leads to them being fixed. But if it’s a problem that the 4th finger on the left or right hand has trouble covering it’s key, a temporary fix can be to cover that open hole with tape. This will affect the pitch, but may be the lesser of two evils.
5. Octave keys
The half-hole (C-sharp5, D5, E-flat5)
To open the half-hole, the first finger of the left hand slides down, while continuing to depress the key, to open the (usually) diamond shaped hole in the first key of the top joint. Sliding is more successful than rolling as it generally has less impact on hand position. If the finger has trouble sliding far and fast enough, a bit of facial grease on the finger acts to help the motion. Don’t press the key any more than just enough to close it.
Sometimes the first finger left hand finger jumps rather than slides or rolls, causing a slight break in the sound. This bad habit needs to be unlearned or it hinders smooth and even technical playing.
Half-hole notes, already with a tendency to be sharp, should not have the first octave key open as well. This will make these notes sharper, and make them sound even airier, although they will come out.
Half-hole to first, back, or thumb octave (E5–G-sharp5)
The half-hole must be covered when the first octave is in use to get a clear sound for these 5 notes. When covering the half-hole and moving to the first octave on the back of the oboe (and back), move the first finger and thumb of the left hand together as one unit in a single motion.
First or back octave to second or side octave (A5–C6)
To move between a first and second octave note, (e.g. G5 and A5), use a rotation of the forearm from the elbow (similar to turning a door knob) to depress the second octave key with the middle of the second finger of the left hand while lifting the fourth finger simultaneously. The first octave key may be left on, as the second octave key cancels it out on North American instruments. However, if the note preceding the A5 does not require the first octave key, it is not necessary to add it for the second octave note since there is no benefit in doing so.
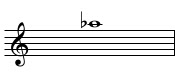
High notes – harmonic fingerings (C-sharp6, D6, E-flat6)
Do not use any octave key on these notes or they become even sharper than they tend to be already.
These notes do require the half-hole, however, and in the case of C-sharp6, the first finger of the left hand comes right up off of the half-hole key, which can feel somewhat awkward and unbalancing at first. The mouth, holding the reed, helps act as an anchor for that fingering.
For D6, the first finger of the left hand should sometimes hold the half-hole key down, but uncovered, and other times remain up in the air, depending on the response and type of articulation preceding it. Generally, if there is an ascending slur to the high D, raising the finger completely off the half-hole briefly will most likely facilitate response. But if the high D is articulated, leaving the half-hole key down, but uncovered, generally is best for response.
For E-flat6, the first finger of the left hand remains down with the half-hole uncovered.
Problem: The D6 is sharp and small sounding.
Solution: The reed is too stiff or too far in the embouchure. Try articulating D6 with the air alone, and the reed rolled in the embouchure the minimum amount to find an appropriate reed placement in the embouchure and the correct air support for easy response. When articulating, keep that optimal embouchure and air support. It may be necessary to almost air attack the D6 even when articulating for ease of response.
Problem: D6 makes a chord-like sound at the beginning of the note when articulating.
Solution: Make sure to keep the half-hole key depressed when articulating a D6.
Problem: D6 is not responding when using a more open, possibly overly vibrant, reed.
Solution: Without actually biting with the teeth, close the mouth more (more of an “ee” vowel) and see if this helps the reliability of the response of the D6. Use a less vibrant, more stable reed.
Problem: The D6 has poor response and lack of tonal clarity.
Solution: The hole in the half-hole key may be clogged with debris. VERY carefully clean the half-hole key with something softer than metal, so to not damage the diamond shape of metal plating at the bottom of the key.
E6 and above
There are standard high note fingerings for C-sharp6 up to C7, but there are multiple variations that may be more appropriate depending on the speed of the passage, and the pitch and responsiveness of the note for each instrument and player. Learn the standard fingering, but don’t be afraid to experiment. Some of the non-standard fingerings may be less well in tune.
For many different options for high note fingerings, see The Woodwind Fingering Guide.
These notes, especially E6, F6, and G-sharp6 and above, require more embouchure pressure than preceding notes to respond consistently. These notes may not respond well if the oboe reed is not stable enough, and/or if the instrument is poorly designed. Generally, learning these notes will be much easier with the assistance of a private instructor and a full conservatory key system. Many students enter college with little experience in this range, but ensemble literature includes these notes and above in technical passages more and more frequently.
These notes can use either the third octave key, if available, or the first octave key. If a third octave key is available, it can be worth trying both possible octave keys to see which fingering responds more easily, cleanly, and with better pitch. The fingerings maybe slightly different in either case due to pitch differences.
6. Downward slurs
When practicing downward slurs, especially large ones, the embouchure changes (rolling the reed out and/or opening the oral cavity), must be abrupt while the air support is strong right until the end of the higher note. Otherwise, the pitch will sag between the notes, like a donkey’s hee-haw sound, and the lower note will “pop” out too loudly. The Pares Scales book has some excellent downward slur exercises for practice at the end of each key, as in the following example:
7. Alternate fingerings
Oboe fingerings are more straightforward in sharp keys. Flat keys, particularly A-flat major and beyond, require alternate fingerings that are initially awkward to learn.
Forked/Left F (F4 and F5)
Right hand/regular F should be used when possible, however when the notes below precede or follow the note F, alternate fingerings are needed
The forked or the left F should be used when the note F is preceded or followed by the notes above, notes involving the right hand 4th finger, which would otherwise be used on the right hand F key. The left F opens the same tone hole as the regular F, and therefore should be used, particularly in slow to moderate paced passages, instead of the forked F because of its more resonant tone quality. Unfortunately, many student models do not have a left F key, so depending on how long they have had an instrument with it, college students may not be used to using left F.
The forked F should be used, however, rather than the left F in many fast passages for greater facility.
The fuzzy, airy tone of the forked F can sometimes be improved by the addition of the E-flat key on student models, although the pitch may become too sharp. However, using the E-flat key with forked F is not a good habit to develop, as it will need to be unlearned when playing a better oboe that has an F resonance key. The F resonance key, standard on a full conservatory key system, usually clarifies and focuses the tone of forked F enough, and the addition of the E-flat key makes the note too sharp.
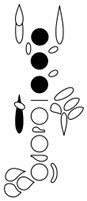
Left E-flat (E-flat 4 and E-flat 5)
When the notes below precede or follow the E-flat, using the left E-flat is likely smoother than sliding between right hand keys with the little finger.
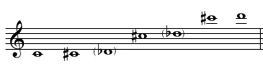
The left E-flat should be used when the note E-flat is preceded or followed by the notes in the example above, which are notes already involving the right hand little finger. This fingering is also used for the D-flat to E-flat trill, in which the right D-flat and the left E-flat keys are held down simultaneously and the D-flat key is moved to make the trill. If this trill does not work (fingering the D-flat does not close the pad that opens when playing E-flat), the oboe is out of adjustment.
If there are problems keeping the left-hand fourth finger on its key while using left E-flat, a piece of tape can be put over the tone hole without too much detriment to the sound or pitch.
Right A-flat (A-flat4 and A-flat5)
When the notes below precede or follow the A-flat, the right A-flat must be used.
The right A-flat can be used when the note A-flat is preceded or followed by the notes in the example above, which are notes involving the left-hand little finger. When the A-flat is preceded specifically by the left E-flat, see below for a specific fingering.
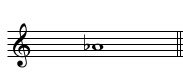
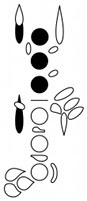
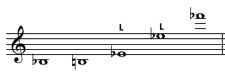
Left E-flat/A-flat (octaves 4 and 5)
The following sequence of fingerings helps to make the passage below more easy to perform by using the left A-flat and E-flat keys pressed at the same time.

The example above is from the first movement of the Camille Saint-Saëns Oboe Sonata. The first fingering should sound a C4, the second E-flat4, and the third Aflat4. The other possible fingering for this passage, somewhat more awkward, would be to use the left E-flat key followed by right A-flat key.
Alternate C4 / “banana” key
For oboes that have the banana key and for those whose fingers can reach it, this key allows another way to play C4, which is usually used when trilling to C#4.
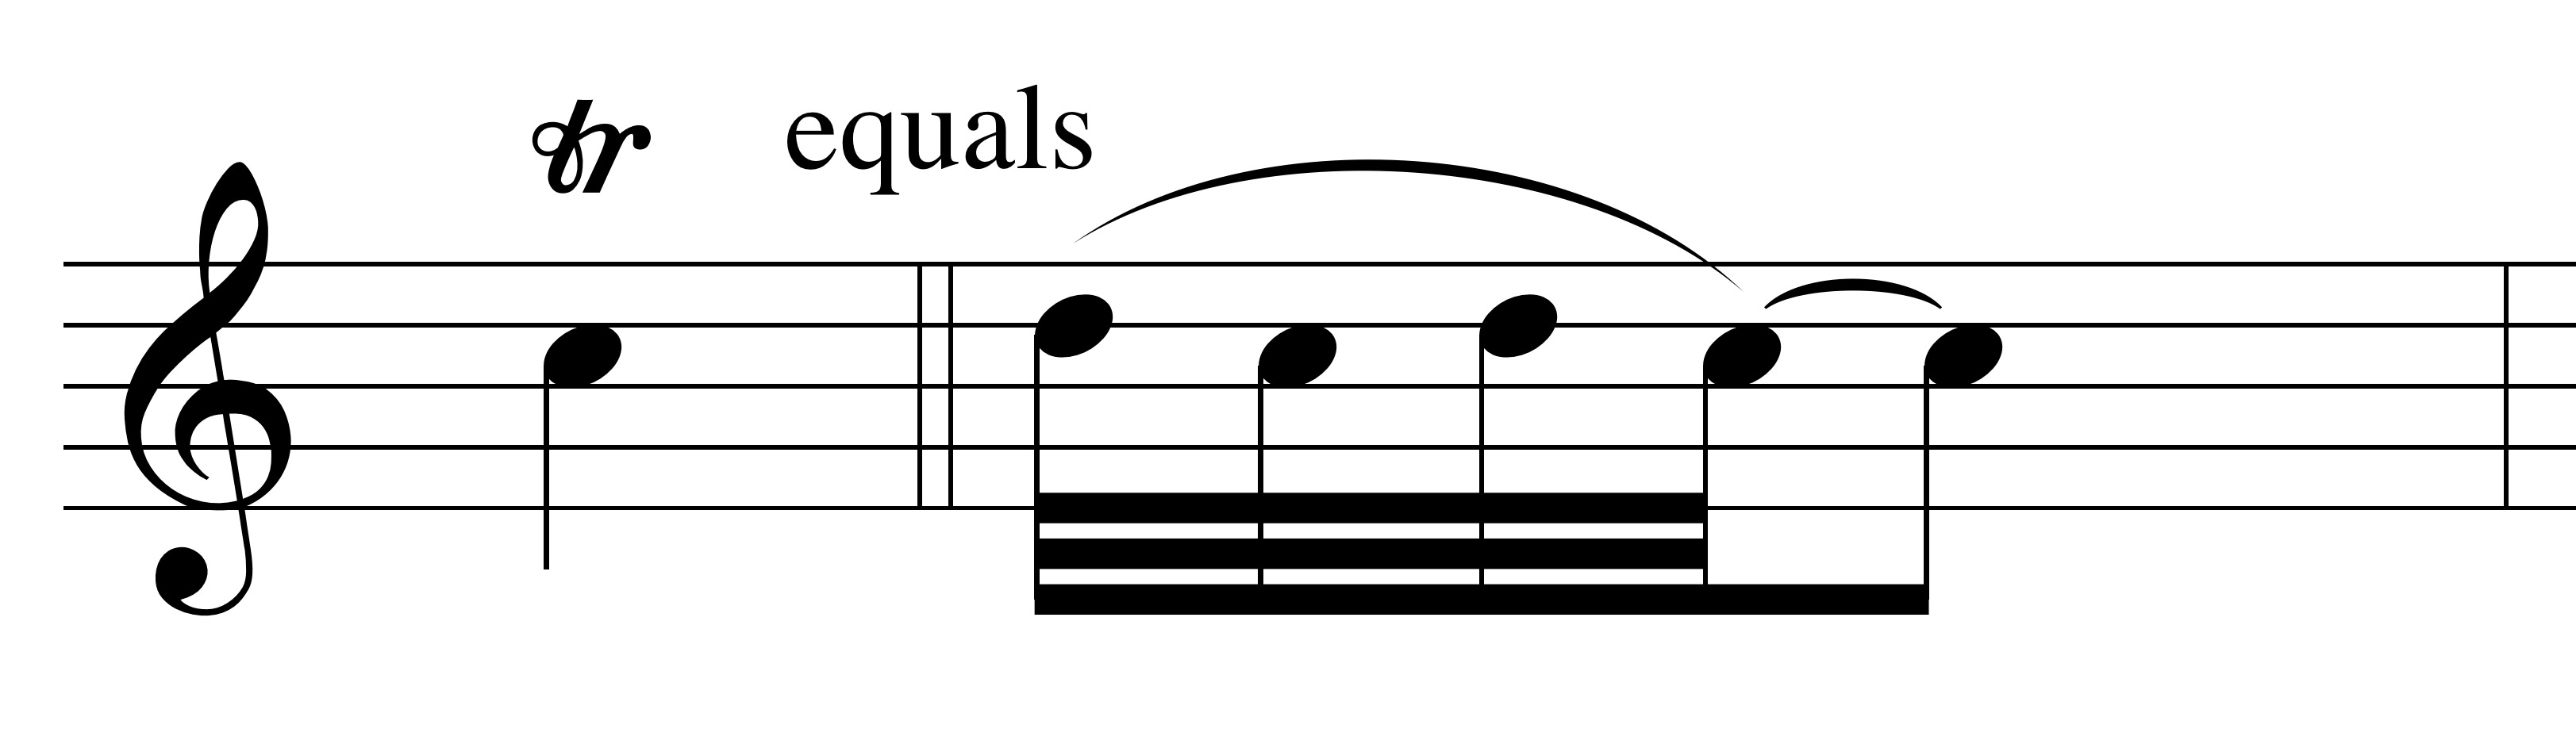
8. Trills and trill fingerings
All trills are possible on full-conservatory oboes except A-sharp3 to B3, which is virtually unplayable. Student models, however, do not have all the keys necessary for all of the trills to be possible. Some student models have more trill fingerings than others.
Baroque versus classical era and beyond trills
Baroque trills generally start with a slightly elongated upper note (unless preceded by the note above) and end on the next pulse. Classical trills can start on the note above, or the written note, and generally the trill lasts through the beat, connecting directly with the nachschlag.

After the classical era, trills are usually performed starting on the written note and trilling throughout the full length of the note.
Practicing trills
Trills can be practiced like any technical passage, slowly and evenly, gradually speeding up. It may be useful to isolate the nachschlag. (see above), practicing connecting with the resolution. It also maybe useful to practice playing a specific consistent amount of trills, particularly in classical era music.
Some trills are more possible than others to perform fast and evenly. The ability to rotate either hand from the elbow easily can allow for very fast trilling, especially when involving the fourth finger of either hand.
9. Technique problems and solutions
- Scale Practice: To learn to play scales evenly, practice lengthening different notes. Try holding one note in the scale (the first or second of a group of four, for example) twice as long as the others. Also experiment with different articulations and different patterns. Practice slowly to find and address awkward hand motions. Practice fast with the metronome to improve consistency.
- Single and Double-Tonguing Practice: To increase speed, accuracy, and the coordination of articulation, practice small amounts of repeated notes fast, tonguing with as little effort as possible. Start with two on the beat or half beat. Gradually increase the speed, the size of the intervals, and the length of time articulating. Alternate between single and double tonguing at similar speeds, working to make them as similar as possible.
- Legato and Downward Slurs: To increase fluidity and smoothness, practice first small, then large legato intervals, being careful to blow “between” the notes, making embouchure and finger changes for different registers very quickly to avoid pitch glissandi and blips. Experiment with playing very slowly and then much faster to work on addressing any issues that arise at different tempos.
- Getting more familiar with high notes. Play all scales two octaves. Play melodies in the high register, perhaps from a book of melodies for the flute. Play slowly and loudly at first, concentrating on response, pitch, and accurate fingerings.
10. Resources
Selected technique books – beginning to hard
Pares Pares Scales for Oboe (Rubank)
Snavely Basic Technique for all Saxophones (Kendor)
Andraud Vademecum of the Oboe (Southern Music Co.)
Hite Foundation Studies (Southern Music Co.)
Articulation – medium to hard
Barret – Method Scales and exercises
Legato intervals – medium to hard difficulty
Pares – Pares Scales for Oboe (Rubank)
Russo – Twenty Contemporary Studies (Elkan)
Marcel Moyse –Tone Development through Interpretation (McGinnis & Marx)
Ferling – 48 Famous Studies (Southern Music Co.)
Technical (and Musical) Etudes – selected. Hard.
Lateef – Repository of Scales and Melodic Patterns
High Notes – Medium
Moyse – Forty Little Pieces in Progressive order for Beginner Flutists (Schirmer)
Practicing Information
Technical advice and exercises
Oboe etude – section A – high note fingerings
Oboe lesson 1.3 reading a fingering chart
One minute oboe lessons blog – trills: A-sharp–B, G-sharp–A

For more information on technique, consult Teaching Woodwinds: A Guide for Students and Teachers.
“Teaching Woodwinds is a ‘must have’ for music educators.” — Mary Kay Fink, Piccolo, Cleveland Orchestra, Flute Instructor, Cleveland Institute of Music
